A. Prerequisite Checks and Steps
SMTP Server Info: you’re going to need the fully qualified name, port information, and authentication information for your smtp server. Get this from your sysadmin so you don’t stall out along the way.
SQL Agent Operator: you may want to create an operator before you set this all up. You’ll use it here in your final test. (Don’t worry, that’s fast.)
Setting Checks: There are a couple things we like to look at before trying to configure Database Mail that can throw a real monkey in your wrench.
- Make sure Service Broker is still enabled in msdb (it is by default)
- Make sure SQL is configured to use the Database Mail XPs (it is NOT by default)
Here’s code to check those things:
Here’s an example of the results that come back:

1 & 1
What if Someone Turned Off Service Broker in msdb?
If for some reason Service Broker isn’t enabled, you may have larger issues than this to worry about:
- Are you using an Edition of SQL Server that supports Database Mail?
- Was msdb ever restored from backup?
You need to ask these questions before enabling it.
How to Enable Database Mail Extended Procedures – TSQL Option
Reconfiguring your server to use the Database Mail XPs is straightforward. You can do this using TSQL, or you can walk through the wizard below. (It will prompt you if you need to make this change.)
B. Configuring Database Mail Using the Wizard
In Object Explorer, expand Management and right click Database Mail:

To Boldly Get Bolded So You Know Exactly Where to Click
Click ‘Next’, then click the first option to set up Database Mail.
Step 1: Create a Profile
Name your profile, then click ‘Add’ to add an account:

The more descriptive the better, since you may want multiple profiles for different purposes.
STEP 2: Create An Account
When adding an account, specify:
- Email address: Most people use SQLSERVER01@yourdomain.com
- Display name: Most people use the SQL Server’s name here, like SQLSERVER01
- Reply email: Most people use DONOTREPLY@yourdomain.com
- Server name: this is the smtp server you’re using. Don’t use gmail for production servers, the screenshot is just an example. Seriously.
- Port and your authentication options. This varies by email service.

Ask your sysadmin for the details of your Exchange server.
Remember to use a smpt server or service you trust; these emails will be vital to monitoring your server’s health.
C. Send a Test Email
Right click on “Database Mail” in Object Explorer. Select “Send a Test Email.” Fill out the helpful little form and make sure it works.
If it doesn’t work, there’s a problem in your setup. Right click “Database Mail” again and select “View Database Mail Log” to go hunting and find out where the issue is.
D. Enable Database Mail on the SQL Server Agent
You’re almost there, we promise. At this point your SQL Server can send mail, but the SQL Server Agent can’t yet. You need to tell it how you want it to use Database Mail for it to have powers to alert you about problems.
Right click on the SQL Server Agent and select properties, like this:

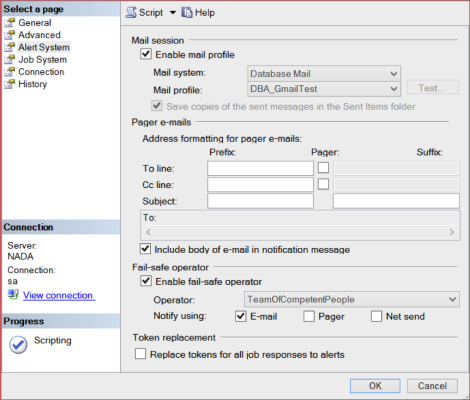
Now Click on the Alert System Tab
This is where you tell the SQL Server Agent what database mail profile to use. Enable the mail profile, then select your mail profile. You may also want to set up your failsafe operator right now. Then click OK.
Restart the SQL Server Agent Service to Make That Take Effect
The SQL Server Agent is a little slow to learn: it won’t be able to use database mail until you restart the Agent service. Important reminders:
- Note that we aren’t talking about the whole SQL Server itself: only the Agent service
- Check if any jobs are running before restarting the SQL Server Agent Service. It will kill the jobs, and won’t automatically restart them, so you may want to wait until a quiet time when jobs aren’t running to do this step.
E. Test Your Work
You’ve come a long way. Here’s how to revel in your success:
- Create a SQL Server agent job named ‘Test’
- Give it a single step named ‘Hi’ which executes: print ‘I love Prince’
- Set the step to notify an operator on completion of the job
- Run the job
- Get the email
- Delete the job
No comments:
Post a Comment